12/31/2008
inspiration

12/30/2008
i heart giraffes

 And I also heart wallpaper, and typography, so naturally, this is the coolest thing ever. Animalia, by sum-design. I'm not sure where I would put this in my house, but it sure is fun! Some other great designs over on the sum website. Check it out!
12/29/2008
airport codes are cool


12/21/2008
on the 17th day of christmas...
12/18/2008
on the 16th day of christmas...

Ok! I have been BAD at keeping up with the days of Christmas...shame on me:( Now that I know people actually look at this thing every day, I've been feeling the pressure to keep it updated!! (Thanks Jennifer and Sydney:) So right now I'm enjoying a little Bing Crosby to get myself in the spirit of things. Stay tuned!!
12/17/2008
on the 15th day of christmas...

12/14/2008
on the 14th day of christmas...
 Here is a quick and easy little idea from Martha. She is using it for a placecard, but I'm picturing making a bunch of these, in all different sizes, for your mantle, as a centerpiece, or anywhere else you need a little festive cheer! They would look pretty in all different color schemes too...
12/13/2008
on the 13th day of christmas...


12/12/2008
on the 12th day of christmas...

12/11/2008
on the 11th day of christmas...


on the 10th day of chrismas...


12/09/2008
on the 9th day of christmas...


12/08/2008
on the 8th day of christmas...

Feeling crafty? Here's a fun, easy little idea for decorations. You could do small ones for the tree, or larger ones like these pictured to hang from the ceiling, window frames, ceiling fans, whatever! I could picture using magazine strips for a glossy look, and there are lots of color combinations you could try: whites and grays for a more elegant look, reds and greens, blue and silver...have fun with it!
12/07/2008
on the 7th day of christmas...


it's not too late!
12/06/2008
on the 6th day of christmas...


12/05/2008
on the 5th day of christmas...
 Egg nog, with love. Shea, this one's for you. What is Christmas without eggnog? My brother usually breaks out our old family recipe around Thanksgiving, and makes it oh, 3 or 4 times between then and New Years. While it's not the healthiest of beverages, it sure does taste good, and this time of year is when you're allowed to splurge...
12/04/2008
on the 4th day of christmas...


12/03/2008
on the 3rd day of christmas...
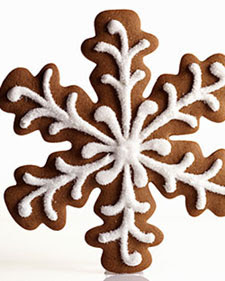
 My true love gave to me...Christmas cookies!!
Ingredients
Makes 16 cookies
6 cups all-purpose flour, plus more for work surface
- 1 teaspoon baking soda
- 1/2 teaspoon baking powder
- 1 cup (2 sticks) unsalted butter
- 1 cup packed dark-brown sugar
- 4 teaspoons ground ginger
- 4 teaspoons ground cinnamon
- 1 1/2 teaspoons ground cloves
- 1 teaspoon finely ground pepper
- 1 1/2 teaspoons coarse salt
- 2 large eggs
- 1 cup unsulfured molasses
- Royal Icing
- Fine sanding sugar, for sprinkling
Directions
- Sift together flour, baking soda, and baking powder into a large bowl. Set aside.
- Put butter and brown sugar in the bowl of an electric mixer fitted with the paddle attachment; mix on medium speed until fluffy. Mix in spices and salt, then eggs and molasses. Reduce speed to low. Add flour mixture; mix until just combined. Divide dough into thirds; wrap each in plastic. Refrigerate until cold, about 1 hour.
- Preheat oven to 350 degrees. Roll out dough on a lightly floured work surface to a 1/4-inch thick. Cut into snowflakes with a 7- inch snowflake-shape cookie cutter. Space 2 inches apart on baking sheets lined with parchment paper, and refrigerate until firm, about 15 minutes.
- Bake cookies until crisp but not dark, 12 to 14 minutes. Let cool on sheets on wire racks.
- Put icing in a pastry bag fitted with a small plain round tip (such as Ateco #7). Pipe designs on snowflakes; immediately sprinkle with sanding sugar. Let stand 5 minutes; tap off excess sugar. Let icing set completely at room temperature, about 1 hour. Store cookies between layers of parchment in an airtight container at room temperature up to 5 days
 Best Cut Out Sugar Cookies from The Kitchen
between 8 and 12 dozen, depending on size
In the bowl of a stand mixer, cream the butter and add the sugar. Cream until light and fluffy. Add the eggs, one at a time, and beat until golden. Add the cream cheese and again beat until well incorporated. Add the flavorings and lemon zest.
Mix the flour, baking powder, and salt in a separate bowl then add, bit by bit, to the butter/sugar mixture.You will have chosen a large bowl for this particular recipe, I hope - mine was overflowing by this point and I ended up doing the final mix in a large plastic bag.
Refrigerate the dough for at least an hour - preferably overnight.
Heat the oven to 350° F. Divide the dough into smaller balls and roll out 1/4 to 1/8 inch thickness. Cut out cookies.
Bake cookies for 8-12 minutes, depending on thickness. The small, thinner ones started browning after about 8 minutes, and I didn't want these brown at all. The larger ones had a slight golden bottom after 11 minutes, which was perfect for my purposes.
Let cool before icing or decorating, and store in a tightly covered container
12/02/2008
on the 2nd day of christmas...


 Cute and simple, by


